
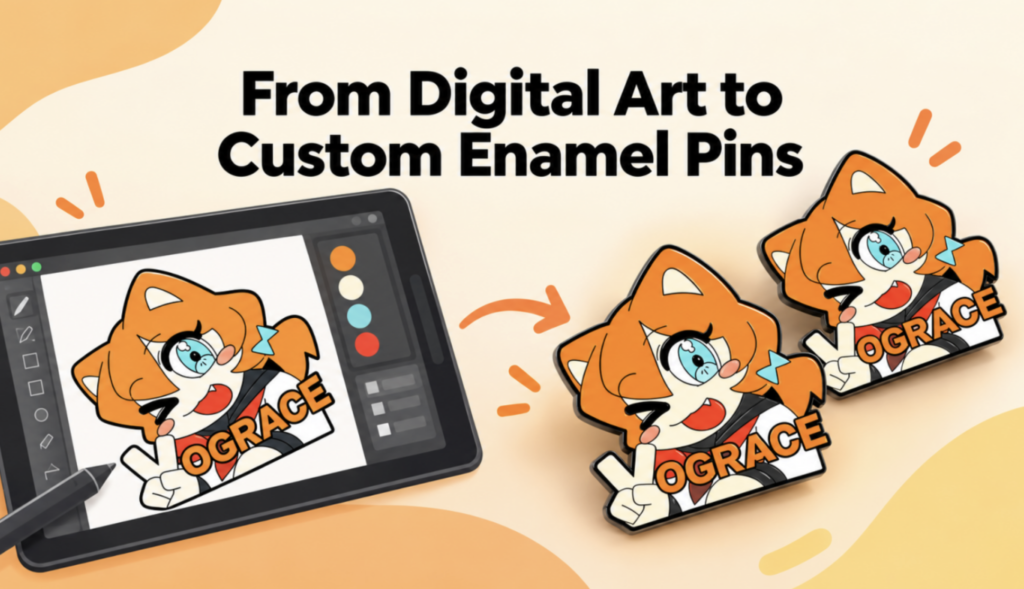
Turning digital artwork into a physical product is one of the most satisfying steps for a creator. A character, logo, or illustration that once lived only on a screen can become something people collect, wear, trade, or display.
Custom enamel pins suit this transformation especially well, but designing for metal and enamel is different from designing for prints or social media. Size, line thickness, color separation, and plating all affect the result.
Start With Artwork That Works at a Small Scale
A detailed illustration does not always need to be reproduced exactly.
Enamel pins are usually viewed at a small size, so strong designs tend to have clear silhouettes, recognizable shapes, and distinct color areas. Fine textures, subtle shadows, or tiny background details may disappear once the artwork is reduced.
Before adapting your design, view it near the size you expect the finished pin to be. Check whether the subject is still recognizable, whether important details remain visible, and whether small lines merge together.
The goal is to preserve what makes the artwork recognizable in a different medium.
Adapt Digital Art for Enamel Production
Digital illustration allows gradients, transparency, and almost unlimited color variation. Traditional enamel pin production is more structured.
Simplify Colors and Shading
Most enamel designs work best with solid color sections. Instead of relying on smooth gradients, translate shadows and highlights into separate blocks of color.
For example, hair painted with many blended shades might become three carefully chosen colors. The design can still feel dimensional while becoming cleaner for production.
Give Fine Details Enough Space
Tiny text, narrow gaps, thin hair strands, and very small facial features can be difficult to reproduce clearly. If a detail is essential, make it larger or simpler.
Pay particular attention to eyes, mouths, lettering, jewelry, patterns, and closely spaced shapes.
Choose the Right Enamel Style
The next step is deciding what type of finish supports the artwork.
Hard enamel has a smooth, polished surface, while soft enamel leaves the enamel slightly recessed beneath raised metal lines. Hard enamel often suits clean character art and polished collectible designs; soft enamel can emphasize outlines and create a more tactile look.
This is a natural point to compare production options. Browsing enamel pins from vograce can help you see how different enamel styles, plating choices, and decorative effects translate into finished products before you finalize your artwork.
Treat Metal as Part of the Design
Metal is not simply a border holding the enamel together. It becomes a visible part of the illustration.
Gold plating can create a warmer decorative feel, while silver-toned or darker finishes can change the mood. Metal lines also define boundaries between many color areas.
Create a quick mockup using a color close to your intended plating. This makes it easier to judge whether the outlines feel balanced before production.
Prepare a Clean Production File
Once the design direction is settled, prepare the artwork specifically for manufacturing.
Keep major color areas easy to identify and remove effects that cannot be translated directly into enamel. A clear file should show the outer shape, metal borders, enamel colors, plating, and any special effects.
If exact colors matter, provide clear color references instead of relying only on your monitor.
Review the Proof Carefully
A production proof is your chance to check how the digital design has been interpreted before manufacturing begins.
Compare it with the original and inspect the proportions, color placement, metal lines, spelling, orientation, and small decorative details. If something feels crowded or unclear, adjust it before production.
Check Pin Size Against Your Artwork
Size directly affects how much detail a pin can carry. A simple icon may work well at a small scale, while a character with layered clothing, accessories, facial details, or lettering may need more room.
There is no single size that fits every design. The best choice depends on both the artwork and where the pin will be worn or displayed. If you want a practical reference, this pin size guide compares common dimensions for enamel, lapel, and button pins.
A useful test is to print your design at 100% scale, cut it out, and place it on a jacket, bag, or pin board. Seeing the artwork at its real dimensions often reveals issues that are easy to miss on a monitor.
Add Special Effects With Purpose
Glitter, glow effects, chains, cutouts, and other decorative options can make a pin more distinctive, but they work best when they support the original idea.
Glitter may suit stars, magical effects, or clothing accents. Glow elements can highlight eyes or symbols. A hanging chain can turn a secondary object into part of the physical composition.
Choose effects because they strengthen the design, not simply because they are available.
From Screen to Something Collectible
Turning digital art into an enamel pin is ultimately an exercise in adaptation.
The goal is not to force every pixel of an illustration into metal. It is to identify what matters most—the silhouette, expression, colors, symbols, or personality—and rebuild those qualities for a small physical object.
Simplify where necessary, make deliberate material choices, test the size, and review the proof carefully. When those decisions work together, the finished pin becomes more than a miniature copy of the original artwork. It becomes a collectible object with a character of its own.
























0 Comments on "From Digital Art to Custom Enamel Pins: A Creator’s Guide"
Would you like to share your thoughts?
Your email address will not be published. Required fields are marked *